How To Edit Or Update A Customer’s Details On KarryBiz
Customer information changes can change for several reasons. People move to new addresses. They change their phone numbers. They create new email addresses. A customer who was based in Lagos relocates to Abuja. A business buyer updates their company contact details. Someone who gave you a personal number now wants to use their business line.Whatever the reason maybe, outdated customer details in your KarryBiz database are more than just an inconvenience. They are a direct threat to your business operations.
An invoice sent to a wrong email never gets read. A delivery dispatched to an old address never arrives. A follow-up message sent to a disconnected number never lands. And every one of those failures erodes the customer relationship you worked hard to build.
The solution is simple: keep your customer records current.
KarryBiz makes editing a customer’s details straightforward and fast — right from your Customers page, without navigating away or filling out lengthy forms. The Edit Customer modal pops up directly on screen, you update what needs changing, and tap “Update” Done.
In this guide, we will walk you through exactly how to edit or update a customer’s details on KarryBiz — step by step, exactly as it appears in the app — along with best practices for maintaining a clean, accurate customer database.

Step-by-Step: How to Edit or Update a Customer’s Details on KarryBiz
Step 1: Log In to Your KarryBiz Account
Open the KarryBiz app on your smartphone and log in using your registered email address and password.
Once logged in, you will land on your main dashboard.
Step 2: Navigate to the Customers Section
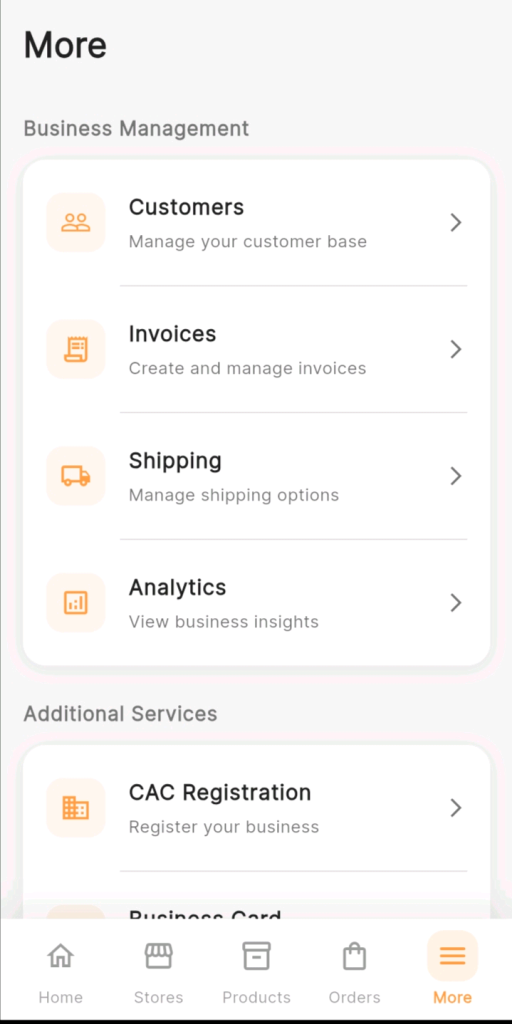
From the bottom navigation bar, tap “More.”
The More page opens showing two main sections — Business Management and Additional Services.
Under Business Management, tap “Customers” to manage your customer base.
This opens your Customers page displaying all customers currently saved in your KarryBiz account.
Step 3: Find The Customer You Want To Edit
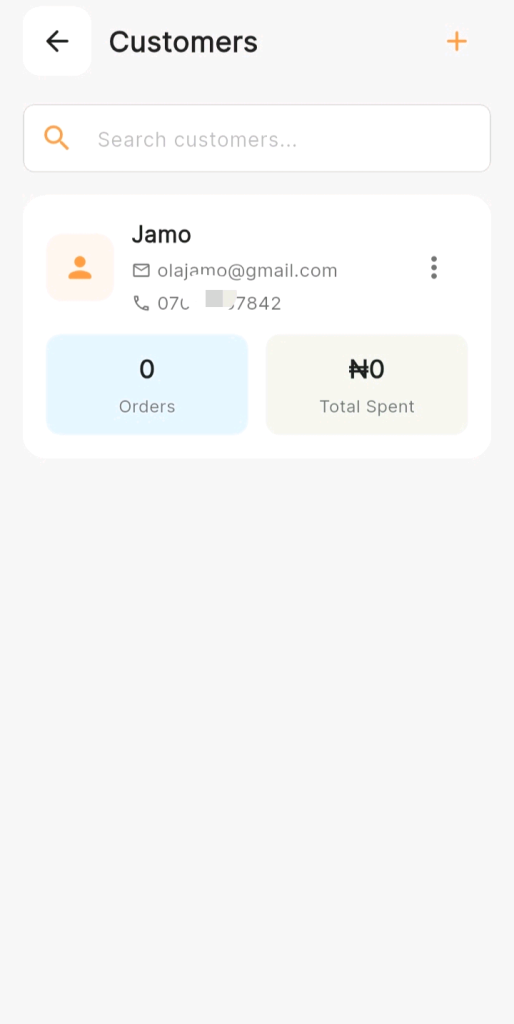
On the Customers page, you will see your customer list displayed as cards and each showing:
• The customer’s name in bold.
• Their email address with a mail icon.
• Their phone number with a phone icon.
• Two summary tags showing Orders count and Total Spent amount.
As shown in the app screenshot, a customer card for “Jamo” displays:
• Email: [email protected].
• Phone: 070xxxxxxxx2.
0 Orders | ₦0 Total Spent
To find a specific customer quickly:
• Use the orange search bar at the top of the page — labeled “Search customers…”
• Type the customer’s name, phone number, or email address.
• The list will filter instantly to show matching results.
Step 4: Tap the Three-Dot Menu on the Customer’s Card
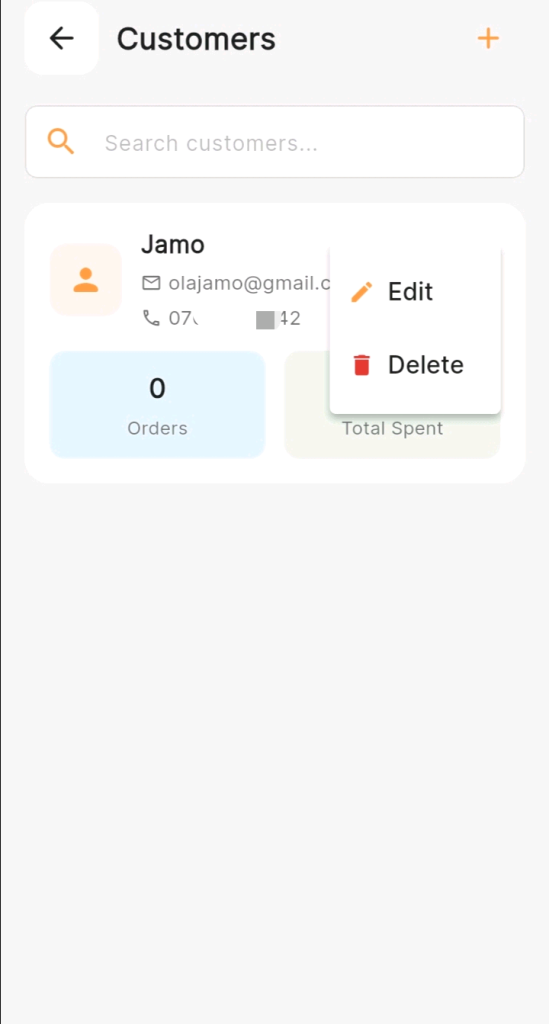
On the customer card you want to edit, look for the three vertical dots (⋮) icon on the right side of the card — next to the customer’s email and phone number.
Tap the three-dot icon (⋮) to open a small action menu with two options:
• Edit.
• Or Delete.
Tap “Edit” to proceed with updating the customer’s details.
Note: Do not tap “Delete” unless you intend to permanently remove this customer from your database. Deletion cannot be undone.
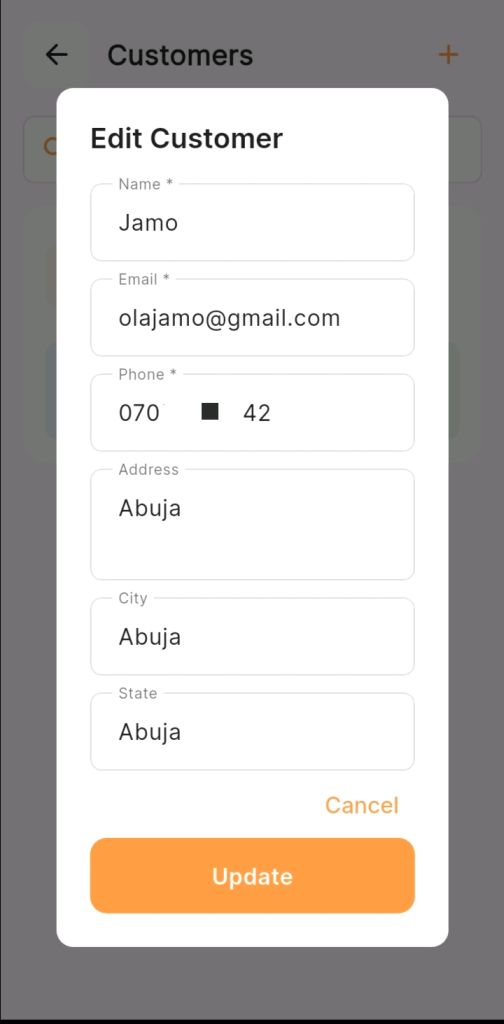
Step 5: The Edit Customer Modal Opens
After tapping “Edit,” the Edit Customer modal appears as a popup overlay on your screen — displaying all the current details saved for this customer, pre-filled and ready for editing.
The modal contains the following fields as seen in the app:
• Name: Currently showing the customer’s saved name (e.g. Jamo).
• Email: Currently showing their email (e.g. [email protected]).
• Phone: Currently showing their phone number (e.g., 070xxxxxxx2).
• Address.
• City.
• State.
And two action buttons at the bottom:
• Cancel.
• Update.
Step 6: Update the Fields That Need Changing
Tap directly on any field you want to update. The field becomes active for editing — clear the existing text and type the new information.
Here is how to handle each field:
• Updating the Name Field.
• Tap the Name field, clear the current name, and enter the corrected or updated name.
Common name update scenarios:
• Fixing a typo from the original entry — “Jamo” corrected to “Jamiu”.
• Adding a last name that was missing — “Jamo” updated to “Jamo Ola”.
• Updating from a nickname to a full name for more professional records.
• Use title case — capitalize the first letter of each name.
Updating the Email Field:
Tap the Email field, clear the old address, and type the new one carefully.
After updating an email:
• Double-check for typos — .com not .vom, no missing @.
• Confirm the new email is one the customer actively checks.
• Send a test invoice to verify the address works correctly.
Updating the Phone Field:
• Tap the Phone field, clear the old number, and enter the new one.
Phone number tips:
• Count the digits after entering — Nigerian numbers are 11 digits (e.g. 070xxxxxxx2).
• Use a consistent format across all customer entries.
• Verify the number is WhatsApp-enabled for seamless communication.
• Updating the Address Field.
• Tap the Address field and enter the customer’s updated street address or general location.
Example: 22 Wuse Market Road, Wuse 2.
Updating the City Field:
• Tap the City field and enter the customer’s current city.
Example: Abuja.
Updating the State Field:
• Tap the State field and enter the customer’s current state.
Example: FCT.
Note: You don’t have to update every field. Only edit the fields that need changing. Fields you did not touch will retain their current saved values.
Step 7: Review Your Changes Before Saving
Before tapping “Update,” take a moment to review every field in the Edit Customer modal.
Note: Don’t rush this step. A wrong phone number or email address saved to a customer’s profile means your invoices and communications go to the wrong place — potentially for a long time before you notice.
Step 8: Tap “Update” to Save Your Changes
Once you are satisfied that all updated details are accurate, tap the large orange “Update” button at the bottom of the Edit Customer modal.
KarryBiz will save your changes immediately and close the modal — returning you to the Customers page with the updated customer card now reflecting the new information.
Your changes are live immediately. The updated details will now appear on the customer’s card, their profile, any new invoices generated for them, and anywhere else their information is referenced on the platform.
Step 9: Verify the Update on the Customer Card
After the modal closes, locate the customer’s card on the Customers page and confirm that their updated details are now displaying correctly.
Note: Tap on the customer’s card to open their full profile and do a more thorough review, confirming all fields show the correct updated information.
Final Thoughts
A customer database is only as valuable as the accuracy of the information inside it. Outdated phone numbers, wrong email addresses, and old delivery locations don’t just create operational headaches — they damage customer relationships and cost you sales.
KarryBiz has made keeping your customer records current as simple as it could possibly be. Three taps to open the Edit modal. A few seconds to update the relevant fields. One tap on “Update” to save.
There is no excuse for stale customer data when the fix takes less than a minute.
Make it a habit. Update customer details the moment they change. Keep your database clean, accurate, and ready to power every invoice, every order, and every customer interaction your business depends on.