How To Set Product Pricing On KarryBiz

Pricing is one of those things that looks simple until you are actually sitting and reflecting on things.
Too high and customers scroll past without a second thought. Too low and you are working hard for margins that barely cover your costs, let alone your time and effort. Just right and your products move steadily, your profit grows predictably, and your business starts to feel sustainable.
Getting your pricing right on KarryBiz is not just about typing a number into a field. It is more about understanding what you are actually selling, who you are selling it to, and what position you want to hold in your market. Price is a signal and it tells customers something about your product before they have read a single word of your description.
And the good news? KarryBiz makes the technical side of pricing genuinely simple.
The Add New Product form gives you two pricing fields: “Selling Price” and “Sale Price” — that, used correctly, give you real flexibility to attract buyers, run promotions, and grow your revenue intelligently.
In this guide, we will walk you through exactly how to set your product pricing on KarryBiz; along with the pricing strategy knowledge that makes those numbers actually work for your business.

Before You Price Your Product: The Questions Worth Asking
Jumping straight to a number without thinking it through is one of the most common mistakes new sellers make. Take two minutes to answer these questions first.
What Did This Cost You?
Your cost price is what you paid to acquire or produce the product. You cannot sustainably price below this and survive. Not for long, anyway.
Your cost should include:
• Purchase or production cost of the product itself.
• Packaging materials.
• Any shipping or logistics costs to get the product to you.
• Your time, if the product is handmade or requires significant preparation.
• Add all of these up. That is your true cost. Everything above it is potential profit.
What Margin Do You Need?
Once you know your cost, decide what profit margin you need to make the product worth selling.
A quick formula: Selling Price = Cost Price ÷ (1 − Desired Margin)
Example: If your product costs ₦3,000 and you want a 40% margin:₦3,000 ÷ 0.60 = ₦5,000 selling price.
Note: 40% is same as 40÷100 and that result in 0.4. 1 – 0.4 = 0.6 as gotten above.
What Are Competitors Charging?
Before you finalize a price, check what other sellers offering similar products are charging. This doesn’t mean you should match them — but you should understand the market.
If you are significantly higher than the market without a clear reason, customers will notice and choose a competitor. If you are lower without a strategy behind it, you may attract bargain hunters who devalue your brand and erode your margins.
Three pricing positions to choose from:
• Below market: Use when you are new and building an audience, or when you can sustain it through volume.
• At market: Compete on quality, service, and branding rather than price.
• Above market: Use when your product is genuinely premium, handmade, or uniquely differentiated.
What Does the Price Signal to Your Customer?
This one surprises a lot of sellers: a price that is too low can actually hurt sales.
If you are selling what should be a premium skincare product and you price it at ₦500, customers do not think “amazing deal.” They think “this can’t be any good.” Price is a quality signal. In categories where customers are buying based on trust and expected results: beauty, health, food — pricing too low communicates the wrong message.
Price your product in a way that is consistent with the quality you are delivering and the brand you are building.
Step-by-Step: How To Set Product Pricing on KarryBiz
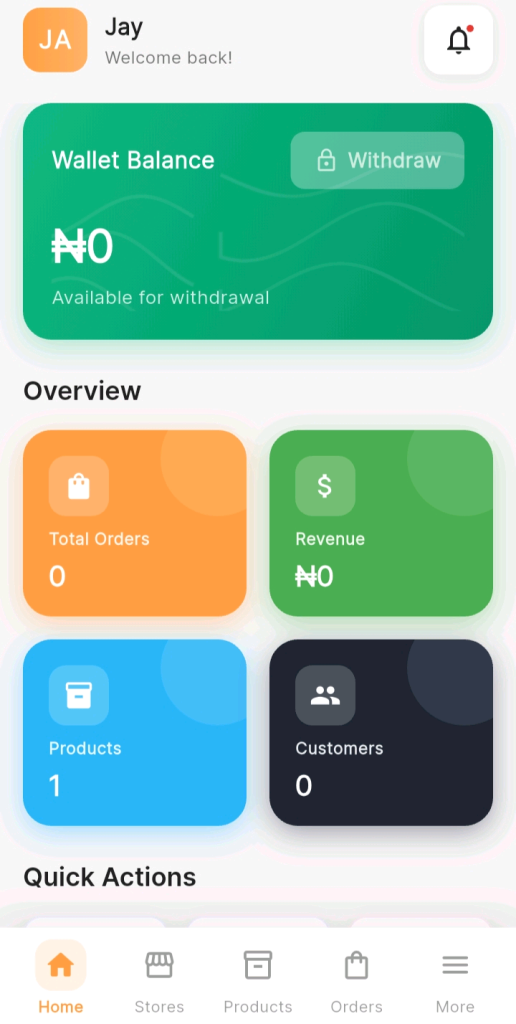
Step 1: Log In and Navigate To Products
Open the KarryBiz app and log in to your account.
From the bottom navigation bar, tap “Products.”
This opens the Products page — where all your listed products are displayed as cards.
Step 2: Add A New Product
To add a new product, tap the orange “+” icon in the top right corner of the Products page.
You will also see a store selector dropdown at the top of the Products page. If you manage multiple stores, make sure the correct store is selected before adding a product.
Step 3: Upload Your Product Images
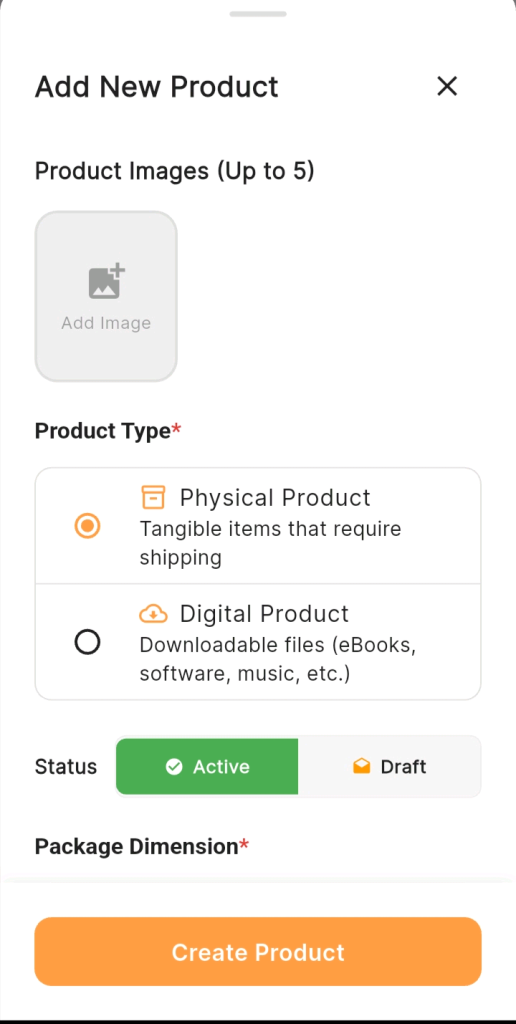
At the top of the Add New Product form, you will see:
Product Images (Up to 5)
Tap the “Add Image” placeholder to upload your product photos. You can add up to 5 images per product — use this allowance wisely.
Step 4: Select Your Product Type
Below the image upload section, you will see the Product Type field — a required field marked with a red asterisk ()*.
Two options are available:
• Physical Product (selected by default): “Tangible items that require shipping”.
Select this for anything that needs to be physically packaged and delivered to the customer — clothing, food, electronics, skincare, accessories, home goods, etc.
• Digital Product: “Downloadable files (eBooks, software, music, etc.)”.
Select this for products that are delivered electronically — no physical shipping required. This includes eBooks, digital templates, music files, software, online course materials, graphic designs, and any other downloadable content.
Step 5: Set Your Product Status
Just below the product type selection, you will see the Status toggle — with two options:
• Active (highlighted in green — makes the product live and visible to customers immediately).
• Draft (saves the product but keeps it hidden from your storefront).
When to use Active: When your product details are complete — photos uploaded, price set, description written. You are ready for customers to see and buy it.
When to use Draft: You are still working on the listing. Maybe the photos aren’t ready yet, or you haven’t finalized the price, or you want to prepare several products before going live all at once.
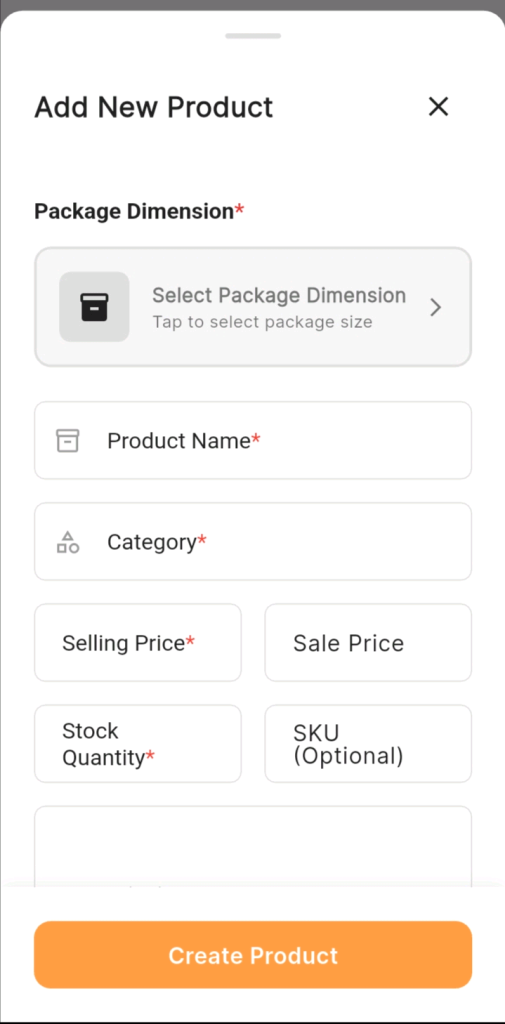
Step 6: Select Your Package Dimension
Below the Status toggle, you will see the Package Dimension field — select the right dimension as required.
Package dimensions help KarryBiz calculate appropriate shipping options and costs for your product. Choosing the right package size ensures:
• Accurate shipping cost calculations for customers.
• Correct delivery partner matching for your product size.
• Proper handling instructions for logistics partners.
• Choose the dimension that most accurately represents your product’s packaged size.
Step 7: Enter Your Product Name
The Product Name field is a required field.
This is the name that appears on your product card, in your store, on invoices, in order confirmations, and everywhere else your product is referenced on the platform.
Step 8: Select Your Product Category
The Category field is a required field.Tap the Category field to open the dropdown and select the category that best fits your product.
As seen in the product card example from the app, a product listed under category “Photoshoot” shows that tag clearly on the product card — helping customers identify what type of product it is at a glance.
Categories you have created in your store’s category management will appear in this dropdown. Choose the one that most accurately represents this specific product.
Step 9: Set Your Selling Price (The Most Important Step)
Now we get to the heart of it.The Selling Price field is required (marked with a red asterisk). This is the standard, regular price at which your product is sold, such as the price customers pay unless a Sale Price is also set.
Tap the Selling Price field and enter your price in naira.
Step 10: Set A Sale Price (Optional but Powerful)
The Sale Price field sits right next to the Selling Price field in the Add New Product form. It is optional, but when used strategically, it is one of the most effective conversion tools available.
When you enter a Sale Price that is lower than the Selling Price, KarryBiz displays both prices to customers — with the original price shown crossed out and the sale price highlighted. This visual immediately communicates:
• The original value of the product.
• The current discounted price.
• Exactly how much the customer is saving.
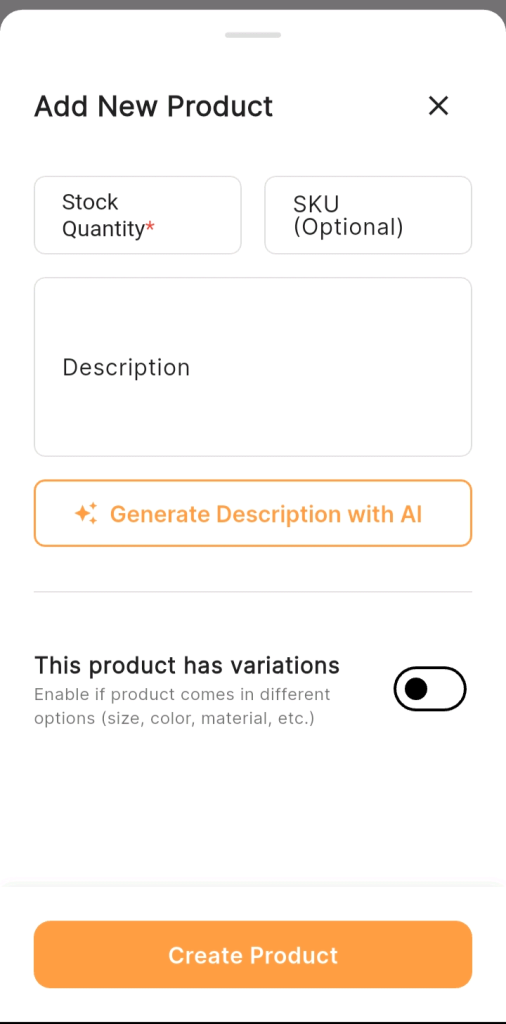
Step 11: Enter Your Stock Quantity
The Stock Quantity field is a required field.
Enter the number of units you currently have available to sell. KarryBiz uses this number to track your inventory — automatically updating the count as orders are placed.
As shown in the product card in the app, a “3 qty” badge with a warning triangle appears when stock is running low — alerting you to restock before you sell out completely.
Step 12: Add an SKU (Optional)
The SKU (Optional) field — Stock Keeping Unit — is a unique code you assign to a product for internal tracking purposes.
You don’t need an SKU to list a product. But if you manage a large inventory across multiple product types, variants, and price points, SKUs make tracking, reordering, and record-keeping significantly more organized.
Step 13: Write Your Product Description
The large Description text field is where you tell the full story of your product — what it is, what it does for the customer, who it is for, and why they should buy it.We covered product description writing in detail in an earlier post — but the key principles are:
• Lead with a benefit, not a feature.
• Be specific — no vague phrases like “good quality” or “nice material”.
• Answer the questions a hesitant buyer would have.
• Include key specifications — size, material, quantity, compatibility.
• End with a clear call to action.
Step 14: Generate Description With AI (KarryBiz Feature)
Here is a genuinely exciting feature — one that sets KarryBiz apart from many other platforms.Below the Description field, you will see a prominently displayed orange-bordered button:
• Generate Description with AI: This is KarryBiz’s built-in AI description generator. Tap it and — based on the product information you have already entered (name, category, price) — the AI will generate a product description for you automatically.
Step 15: Enable Product Variations (If Applicable)
Near the bottom of the Add New Product form, you will see:
This product has variations: “Enable if product comes in different options (size, color, material, etc.)”.
Step 16: Tap “Create Product”
Once every required field is filled in — images uploaded, product type selected, package dimension chosen, name entered, category selected, selling price set — tap the large orange “Create Product” button at the bottom of the form.
Your product is now live on your KarryBiz store (if you set the status to Active) — or saved as a draft (if you chose Draft) — ready for customers to discover and purchase.
Final Thoughts
Pricing is never just a number. It is a decision that shapes how customers perceive your product, how much profit you keep from every sale, and how your brand positions itself in the market.
KarryBiz gives you the tools and avenue in form of Selling Price, Sale Price, variations, AI description generation — to build product listings that are competitive, compelling, and profitable. But the strategic thinking that makes those tools work has to come from you.
Know your costs. Understand your market. Choose your position. Set your price with intention.
Then use the Sale Price feature when it genuinely makes sense for real promotions, real launches, and real occasions.