How To Upload Product Images That Sell On KarryBiz

Let us be brutally honest about something with making purchases online.
When a customer lands on your KarryBiz store, they are not reading your product description first. They are not checking your price first. They are not looking at your store name or your logo or your carefully written store description. They first look at your products photos, since this is not a physical store.
And within two seconds, sometimes less — they have already decided whether your product is worth their attention or not. Before a single word has been read or a single price has been checked.
That is the power of a product image. And that is the risk of getting it wrong.
Bad photos kill sales. Not because your product is bad. Not because your price is wrong. But because the human brain is wired to judge quality visually — and a blurry, dark, poorly composed product photo communicates one thing to every potential buyer: “This seller doesn’t take their business seriously.”
A great product photo, on the other hand, does the opposite. It builds instant trust. It makes the product look desirable. It answers questions before the customer even thinks to ask them. And it does all of that silently — in under two seconds — before the buyer has consciously processed a single thought.
The good news? You don’t need a professional camera or a photography studio to take great product photos. Your smartphone already in your pocket, is capable of producing images that genuinely sell. You just need to know how to use it right.
In this guide, we will walk you through exactly how to upload product images that sell on KarryBiz. From taking the photos to uploading them correctly with practical tips that work in the real world, not just in a photography studio.

Why Your Product Photos Are Your Most Important Sales Tool
Your images have to do the work that a physical product does in a shop — show the customer what it looks like up close, demonstrate how it works, show its size and scale, reveal its texture and quality, and make them feel confident enough to hand over their money to someone they have never met.
That is a lot of weight for a single image to carry. Which is why KarryBiz have given every store owner the privilege to upload up to 5 photos of their products.
The Equipment You Actually Need
Here is the refreshing truth: you don’t need expensive equipment.
What you need instead:
• Your smartphone: Any modern Android or iPhone camera will do.
• Natural light: A window or outdoor space in the shade.
• A clean, simple background: white cardboard, a plain wall, or a neat flat surface.
• A free editing app: Lightroom Mobile, Snapseed, or Canva.
What you don’t need:
• A DSLR camera.
• A photography studio.
• Professional lighting equipment.
• A paid photographer (for most products).
Part One: Taking Photos That Actually Sell
Before you can upload great images, you need to take them. Let us start here.
The 5 Types of Photos Every Product Needs
Don’t upload just one photo and hope for the best. Every product on your KarryBiz store should have at least three to five images, with each showing something different.
1. The Hero Shot (Your Main Product Image):
This is the first image customers see — the one that appears on your store’s product listing page. And it needs to be perfect.
What makes a great hero shot:
• Clean, plain background: white or light grey works best for most products.
• The product centered and filling most of the frame.
• Sharp focus: no blurriness anywhere.
• Accurate colors: no heavy filters that distort how the product actually looks.
• Good lighting: bright but not washed out.
Background options that work:
• A white bedsheet or tablecloth laid flat.
• A light-colored wall.
• White cardboard or A3 paper from a stationery shop.
• A simple wooden table surface for food or lifestyle products.
2. Detail Shots (Show The Quality Up Close):
After the hero shot, give customers close-up photos that show the craftsmanship, texture, material, or specific features of your product.
Note: Detail shots answer the quality question that every online buyer is silently asking: “Is this as good as it looks in the main photo?” Your goal as the seller is to make the products image convincing that it clears every doubt or hesitation they may have about the product with this image.
3. Scale Reference Shot (How Big Is It Really?):
One of the most common complaints in online shopping both globally and in Nigeria — is receiving a product that is not the size the buyer expected. A scale reference shot eliminates this problem.
Show your product next to something familiar:
• A human hand holding it.
• A product worn on a model.
• Common household items that everyone knows the size of.
Note: For clothing and fashion — always include a model photo or a flat-lay with measurements indicated. For bags, show the bag being held by a person. For food products, show a serving suggestion with a plate or bowl.
4. Lifestyle Shot (Show It in the Real World):
A lifestyle shot shows your product being used in a real-life context and not just sitting on a white background, but actually living its purpose in the world.
A dress being worn at an event. Skincare products arranged on a bathroom shelf. A snack being enjoyed at a table. A phone case on an actual phone.
Lifestyle shots sell the experience of owning the product — not just the product itself. They help customers visualize themselves using it. And that visualization is what tips hesitant buyers into confident purchasers.
5. Variant Shots (Show Every Color and Version):
If your product comes in multiple colors, sizes, or variations — each variant needs its own clear photo.
Don’t make customers guess what “Navy Blue” or “Wine Red” looks like. Show them. Don’t assume they can visualize the difference between your small and large sizes. Show the comparison.
Every unshown variant is a potential sale lost to uncertainty.
• Pro tips: Use natural lights and avoid directs sunlights as it might cast shadows on the image. When using artificial lights or flash lights avoid casting shadows on the images.
Part Two: Uploading Your Product Images on KarryBiz
Now that your photos are ready, let us get them onto your KarryBiz store correctly.
Step 1: Log In and Navigate to Products
• Open the KarryBiz app and log in to your account.
• From the bottom navigation bar, tap “Products.”
• This opens your product management page — where all your listed products are displayed.
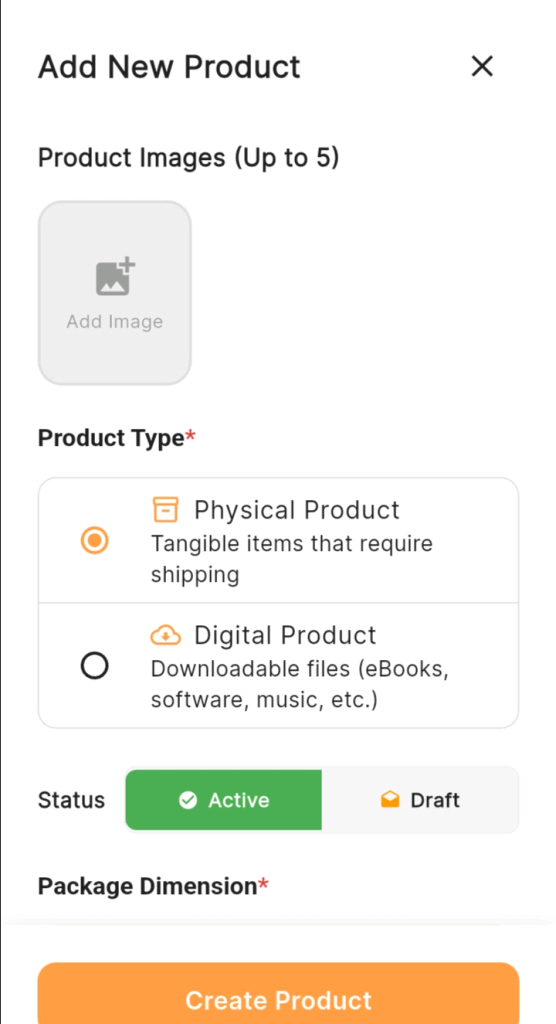
Step 2: Add A New Product Or Edit An Existing One
To add images to a new product: Tap the “Add Product” button to create a new listing. The product creation form will open.
To add or update images on an existing product:
Find the product you want to update, tap on it, and tap “Edit” to open the editing form.
Step 3: Find The Image Upload Section
In the product form, scroll to the product image section — at the top of the form, with a placeholder image area or an upload icon.
You will see:
With KarryBiz you can upload 5 products images in the order you want them to be displayed.
Step 4: Select and Upload Your Photos
Your phone’s gallery will open. Navigate to the photos you have taken and prepared for this product.
Upload in this order:
• Hero shot first: This becomes your primary listing image.
• Detail shots: Upload your close-up quality photos next.
• Scale reference: The image showing size or model wear.
• Lifestyle shot: The in-context, real-world image.
• Variant shots: Color or size variations if applicable.
Step 5: Arrange Your Images in the Right Order
Recommended image order:
• Hero shot — clean background main image.
• Second angle — different perspective of the same hero shot setup.
• Detail shot — close-up of quality or texture.
• Scale reference — size context or model wear.
• Lifestyle shot — product in real-world use.
The first image is the one customers see on your product listing page before they click. Make sure it is your absolute best.
Step 6: Preview How Your Listing Looks
Before saving, tap “Preview” if this option is available or save the product and view it as a customer would by visiting your storefront.
Ask yourself these questions as you look at it:
• Does the main image make me want to click on this product?
• Can I clearly see what the product is and what it looks like?
• Do the photos answer the questions a buyer would have about size, quality, and color?
• Does the image quality look professional and trustworthy?
• Would I buy this product based on these photos?
Note: If the answer to any of these is no — go back and improve.
Step 7: Save Your Product Listing
Once you are satisfied with how everything looks, tap “Save” to publish your product with its images to your KarryBiz store.Your product is now live — with photos that give it the best possible chance of converting visitors into customers.
Final Thoughts
You can have the best product in your category. The most competitive price. The fastest delivery. The friendliest customer service. And still lose sales — every single day — because your photos don’t do justice to what you are selling.
Great product photography is not about being a photographer. It is about understanding that your photos are doing a job — the job of selling your product to someone who can’t see it in person — and giving that job the respect it deserves.
You have everything you need to get this right. A smartphone, a window, good natural light, a clean background, all aided by this guide.
Take the photos. Edit them simply. Upload them correctly. And watch what happens when buyers land on your store and actually want to click on what they see.